The Authority's Handbook
A guide to setting up your own TLS/SSL certificate authority (CA) using OpenSSL
Preface
This post page book started some time ago when
I learned about the SSL chain of trust from my security professor. I set out to
“learn by doing” by setting up my own certificate authority, using it to sign
my own certificates, and then using those certificates to encrypt files and
sign content, then decrypt and verify.
It was a valuable lesson in security, but gaining the knowledge to do this required scouring the Web and OpenSSL manuals for an in-depth understanding. It was this understanding that allowed me to decipher what each part to each command meant, and why each part was necessary. I compiled the precursor to this book as a series of annotated commands for my own personal reference, but it soon grew into a very large document. I thought to post it online, and so I gave it a home here.
Before I jump into the innards of TLS/SSL, I would like to point out that there is nothing wrong with trusting the “top level” certificate authorities: there is no reason not to trust certificates signed by DigiCert, Symantec/Verisign, GeoTrust, or Comodo. These certificate authorities have worked hard to establish themselves as members of the few trusted authorities on all major operating systems and browsers, and kudos to them for keeping our information secure through SSL. This tutorial is not meant to instill distrust for the trusted root certificate authorities. It is merely a technical guide and reference on how to use SSL to secure information as it travels across the Internet.
Acknowledgments
As previously mentioned, this information was compiled from several sources around the Internet and from the OpenSSL documentation, but among the most influential sources are:
Introduction
When performing any data transfer over a network, the information is sent in pieces of data called packets. Packets have basic information about where it originated, where it is going, how much data it contains, and how to interpret its contents. For example, here is an HTTP response packet from a simple website:
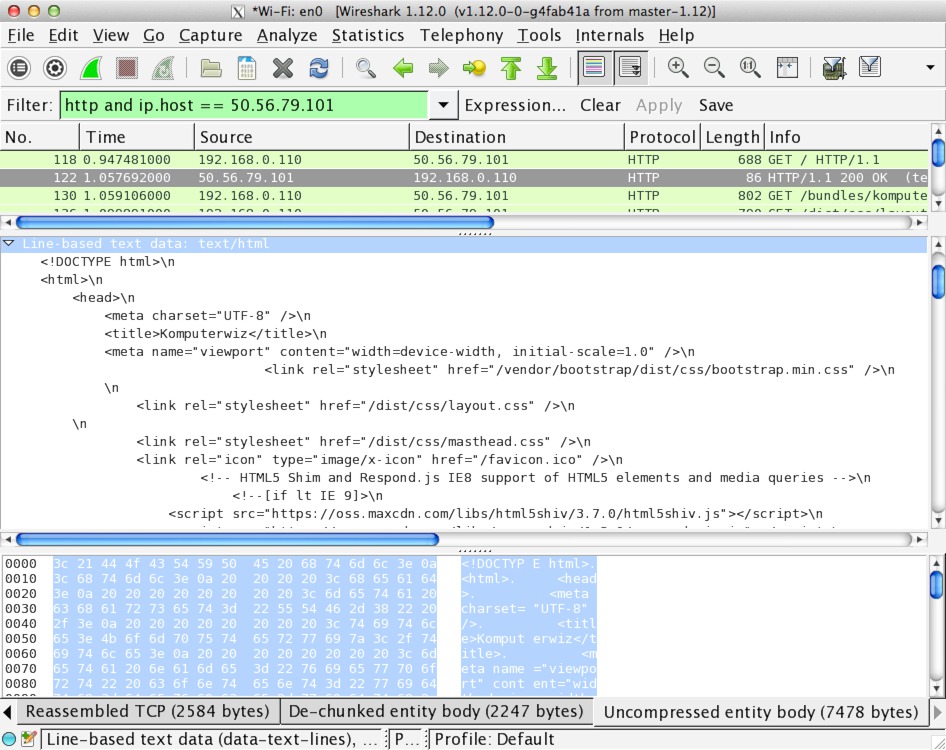
HTTP packet in Wireshark
The contents of this packet are plaintext: anyone who intercepts this packet can read its contents. SSL encrypts the TCP layer of this packet, rendering the main contents unreadable by anyone except the recipient for whom it is intended. Here is the same packet, only encrypted with a 2048-bit RSA key.
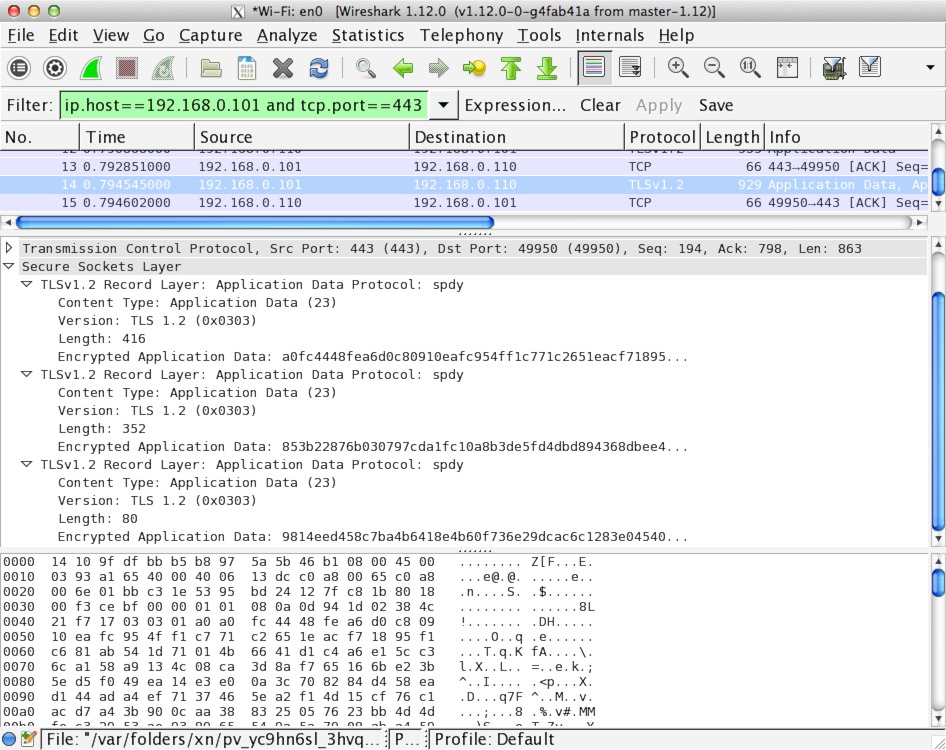
HTTPS packet in Wireshark
Technically, this stuff is called Transport Layer Security (TLS). TLS is
the successor to Secure Socket Layer (SSL) and offers better security, but
I call everything here SSL for synchronicity between it and the openssl
program used… and because just about everyone else still calls it SSL.
SSL can be used to encrypt just about anything: web pages (HTTP), emails (POP, IMAP, SMTP), and file transfers (FTP) to name a few. Here we will focus on securing HTTP since it is the most common use-case.
Motivation and Goals
Anyone who has set up a site with a self-signed “snakeoil” certificate is familiar with the following panicky message:
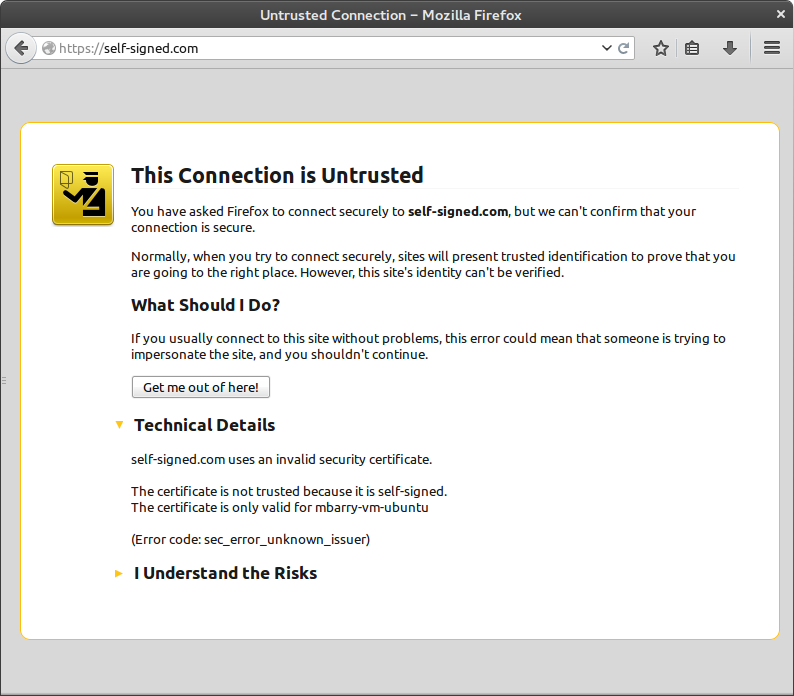
Browser screaming at an untrusted connection message
This strong message is annoying to us developers/administrators and is quite unsettling for our users. Personally, I think this page would be more appropriately displayed on any page that is not loaded over HTTPS: anything could happen to a plaintext packet in transport, and neither the browser nor the user would notice.
Caution: If you ever encounter this message in the wild, please do take it seriously: it means exactly what it says. When visiting a website whose identity cannot be verified by another trusted party, the choice is left up to the user to indicate whether they trust the site or not. This is usually an indication that a malicious site is posing as a legitimate website.
Think of it like this: suppose we are friends with Alice and Bob, but they have never met before, so we decide to introduce them. Alice feels she can trust Bob because she trusts us as a friend, and Bob feels he can trust Alice for the same reason. In this scenario, we play the role of the trusted certificate authority, and Alice and Bob take turns playing the roles of browser and server.
It is important to note that the information transferred over said untrusted connection is still secure: the information is being encrypted on the server, transmitted to the browser client, and decrypted for display in the viewport. The only hiccup in the process is that the browser cannot verify the source of the content. To continue with the analogy, imagine Alice and Bob meeting as strangers in a restaurant. In this case, they would have to establish trust on their own, which is a lot harder than “piggybacking” on the trust of a mutual friend.
For reference, here is a handy chart showing the different levels of trust and security:
| HTTP Plaintext | HTTPS (Untrusted) | HTTPS (Trusted) | HTTPS with Login | HTTPS with Client Cert | |
|---|---|---|---|---|---|
| Data Encryption | |||||
| Verified Site Identity | |||||
| User Identity | |||||
| Verified User Identity |
One way to remedy the “untrusted” warning is to purchase a SSL certificate signed by a recognized certificate authority. This method is generally preferred if many users will be accessing the website securely. If only a handful of known users will access the site for a very specific purpose, then it may be more beneficial to save the money and install a certifice yourself. The certificate may be self-signed or signed by a custom certificate authority. The latter option is the primary focus of this tutorial.
Once installed, certificates must be marked as trusted. Self-signed certificates must be marked as trusted individually since each one is entirely unique. Certificates that are signed by a certificate authority can be validated by following the chain of signatures back to the root certificate. The decision to trust the certificate comes from whether the client trusts all of the certificates in the chain. This tutorial will explain how to configure client operating systems and browsers to trust a custom authority.
Finally, as depicted in the table above, SSL allows for users to supply their own certificates as a more secure authentication mechanism. This tutorial also explains how to accomplish this.
Without further ado, let’s dive in!
Setup
Since this tutorial focuses on OpenSSL, it is assumed that the reader is running a UNIX-like environment and is familiar with the terminal. In other words, if you are running Linux, OS X, or UNIX, then you’re good to go. If you are running Windows, you can use Cygwin to “get that Linux feeling on Windows.”
OpenSSL Installation
Please follow the directions below as they pertain to your operating system:
Windows. During Cygwin installation, select Net » openssl.
OS X. You already have OpenSSL. Hooray!
GNU/Linux and UNIX. Most distributions include OpenSSL already. If which openssl outputs nothing in your terminal, please use your distro’s package
manager to install the openssl package, or
download and compile it yourself.
Preliminary Directory Structure
Create a directory that will serve as the base directory for your certificate authority. OpenSSL will use this directory to handle keys, certificates, certificate signing requests, certificate revocation lists, etc.
mkdir MyAwesomeCA
cd MyAwesomeCA
Next, create the base directory structure for the CA “database”. After this, OpenSSL will handle most of these files automatically.
mkdir certs newcerts private
touch index.txt
echo 1000 > serial
Each file and directory serves a specific purpose:
- certs
- directory containing certificates (*.crt.pem) and certificate signing requests (*.csr.pem)
- newcerts
- directory containing copies of generated certificates and named according to their serial number.
- This directory will be managed by OpenSSL.
- private
- directory containing generated private RSA keys (*.key.pem)
- index.txt
- The database file mapping certificate subject lines and serial numbers.
- OpenSSL will handle the organization of this file
- serial
- A file containing the next certificate serial number (in this case we start from 1000).
- This number will be incremented after signing a new certificate.
Configuration
OpenSSL commands can be quite complex depending on the options given such as directory structure, key sizes, and locality information. If an option is unspecified, it will assume its default value specified in the OpenSSL configuration file. The default configuration file is located in /etc/ssl/openssl.cnf.
Below is a modified copy of the default configuration file with some additional
extensions (v3_ca, v3_req, etc.) that allow us to set certificate
properties for specific purposes. Copy the configuration below and save it to
openssl.cnf in your CA base directory.
CA_default.dir,
req.default_bits, and req_distinguished_name.*_default options. If you wish
to set up a published certificate revocation list (recommended), please change
the crlDistributionPoints configuration values in [v3_ca] and
[client_cert]#
# OpenSSL example configuration file.
# This is mostly being used for generation of certificate requests.
#
# This definition stops the following lines choking if HOME isn't
# defined.
HOME = .
RANDFILE = $ENV::HOME/.rnd
# Extra OBJECT IDENTIFIER info:
#oid_file = $ENV::HOME/.oid
oid_section = new_oids
# To use this configuration file with the "-extfile" option of the
# "openssl x509" utility, name here the section containing the
# X.509v3 extensions to use:
# extensions =
# (Alternatively, use a configuration file that has only
# X.509v3 extensions in its main [= default] section.)
[ new_oids ]
# We can add new OIDs in here for use by 'ca', 'req' and 'ts'.
# Add a simple OID like this:
# testoid1=1.2.3.4
# Or use config file substitution like this:
# testoid2=${testoid1}.5.6
# Policies used by the TSA examples.
tsa_policy1 = 1.2.3.4.1
tsa_policy2 = 1.2.3.4.5.6
tsa_policy3 = 1.2.3.4.5.7
####################################################################
[ ca ]
default_ca = CA_default # The default ca section
####################################################################
[ CA_default ]
dir = . # Where everything is kept
certs = $dir/certs # Where the issued certs are kept
crl_dir = $dir/crl # Where the issued crl are kept
database = $dir/index.txt # database index file.
#unique_subject = no # Set to 'no' to allow creation of
# several ctificates with same subject.
new_certs_dir = $dir/newcerts # default place for new certs.
certificate = $dir/ca.crt.pem # The CA certificate
serial = $dir/serial # The current serial number
crlnumber = $dir/crlnumber # the current crl number
# must be commented out to leave a V1 CRL
crl = $dir/crl.pem # The current CRL
private_key = $dir/private/ca.key.pem # The private key
RANDFILE = $dir/private/.rand # private random number file
x509_extensions = usr_cert # The extentions to add to the cert
# Comment out the following two lines for the "traditional"
# (and highly broken) format.
name_opt = ca_default # Subject Name options
cert_opt = ca_default # Certificate field options
# Extension copying option: use with caution.
# copy_extensions = copy
# Extensions to add to a CRL. Note: Netscape communicator chokes on V2 CRLs
# so this is commented out by default to leave a V1 CRL.
# crlnumber must also be commented out to leave a V1 CRL.
crl_extensions = crl_ext
default_days = 3650 # how long to certify for
default_crl_days = 30 # how long before next CRL
default_md = default # use public key default MD
preserve = no # keep passed DN ordering
# A few difference way of specifying how similar the request should look
# For type CA, the listed attributes must be the same, and the optional
# and supplied fields are just that :-)
policy = policy_match
# For the CA policy
[ policy_match ]
countryName = match
stateOrProvinceName = match
organizationName = match
organizationalUnitName = optional
commonName = supplied
emailAddress = optional
# For the 'anything' policy
# At this point in time, you must list all acceptable 'object'
# types.
[ policy_anything ]
countryName = optional
stateOrProvinceName = optional
localityName = optional
organizationName = optional
organizationalUnitName = optional
commonName = supplied
emailAddress = optional
####################################################################
[ req ]
default_bits = 4096 #2048
default_keyfile = generated.key.pem
distinguished_name = req_distinguished_name
attributes = req_attributes
x509_extensions = v3_ca # The extentions to add to the self signed cert
# Passwords for private keys if not present they will be prompted for
# input_password = secret
# output_password = secret
# This sets a mask for permitted string types. There are several options.
# default: PrintableString, T61String, BMPString.
# pkix : PrintableString, BMPString (PKIX recommendation before 2004)
# utf8only: only UTF8Strings (PKIX recommendation after 2004).
# nombstr : PrintableString, T61String (no BMPStrings or UTF8Strings).
# MASK:XXXX a literal mask value.
# WARNING: ancient versions of Netscape crash on BMPStrings or UTF8Strings.
string_mask = utf8only
# req_extensions = v3_req # The extensions to add to a certificate request
[ req_distinguished_name ]
countryName = Country Name (2 letter code)
countryName_default = US
countryName_min = 2
countryName_max = 2
stateOrProvinceName = State or Province Name (full name)
stateOrProvinceName_default = Texas
localityName = Locality Name (eg, city)
localityName_default = Bryan
0.organizationName = Organization Name (eg, company)
0.organizationName_default = Komputerwiz Web Design
# we can do this but it is not needed normally :-)
#1.organizationName = Second Organization Name (eg, company)
#1.organizationName_default = World Wide Web Pty Ltd
organizationalUnitName = Organizational Unit Name (eg, section)
#organizationalUnitName_default =
commonName = Common Name (e.g. server FQDN or YOUR name)
commonName_max = 64
emailAddress = Email Address
emailAddress_max = 64
# SET-ex3 = SET extension number 3
[ req_attributes ]
challengePassword = A challenge password
challengePassword_min = 4
challengePassword_max = 20
unstructuredName = An optional company name
[ usr_cert ]
# These extensions are added when 'ca' signs a request.
# This goes against PKIX guidelines but some CAs do it and some software
# requires this to avoid interpreting an end user certificate as a CA.
basicConstraints=CA:FALSE
# Here are some examples of the usage of nsCertType. If it is omitted
# the certificate can be used for anything *except* object signing.
# This is OK for an SSL server.
# nsCertType = server
# For an object signing certificate this would be used.
# nsCertType = objsign
# For normal client use this is typical
# nsCertType = client, email
# and for everything including object signing:
# nsCertType = client, email, objsign
# This is typical in keyUsage for a client certificate.
# keyUsage = nonRepudiation, digitalSignature, keyEncipherment
# This will be displayed in Netscape's comment listbox.
nsComment = "OpenSSL Generated Certificate"
# PKIX recommendations harmless if included in all certificates.
subjectKeyIdentifier=hash
authorityKeyIdentifier=keyid,issuer
# This stuff is for subjectAltName and issuerAltname.
# Import the email address.
# subjectAltName=email:copy
# An alternative to produce certificates that aren't
# deprecated according to PKIX.
# subjectAltName=email:move
# Copy subject details
# issuerAltName=issuer:copy
# Distribution point for this CA's certificate revocation list
#crlDistributionPoints = URI:http://example.com/crl.pem
#nsCaRevocationUrl = http://www.domain.dom/ca-crl.pem
#nsBaseUrl
#nsRevocationUrl
#nsRenewalUrl
#nsCaPolicyUrl
#nsSslServerName
# This is required for TSA certificates.
# extendedKeyUsage = critical,timeStamping
[ v3_req ]
# Extensions to add to a certificate request
basicConstraints = CA:FALSE
keyUsage = nonRepudiation, digitalSignature, keyEncipherment
[ v3_ca ]
# Extensions for a typical CA
# PKIX recommendation.
subjectKeyIdentifier=hash
authorityKeyIdentifier=keyid:always,issuer
# This is what PKIX recommends but some broken software chokes on critical
# extensions.
#basicConstraints = critical,CA:true
# So we do this instead.
basicConstraints = CA:true
# Key usage: this is typical for a CA certificate. However since it will
# prevent it being used as an test self-signed certificate it is best
# left out by default.
# keyUsage = cRLSign, keyCertSign
# Some might want this also
# nsCertType = sslCA, emailCA
# Include email address in subject alt name: another PKIX recommendation
# subjectAltName=email:copy
# Copy issuer details
# issuerAltName=issuer:copy
# DER hex encoding of an extension: beware experts only!
# obj=DER:02:03
# Where 'obj' is a standard or added object
# You can even override a supported extension:
# basicConstraints= critical, DER:30:03:01:01:FF
[ crl_ext ]
# CRL extensions.
# Only issuerAltName and authorityKeyIdentifier make any sense in a CRL.
# issuerAltName=issuer:copy
authorityKeyIdentifier=keyid:always
[ proxy_cert_ext ]
# These extensions should be added when creating a proxy certificate
# This goes against PKIX guidelines but some CAs do it and some software
# requires this to avoid interpreting an end user certificate as a CA.
basicConstraints=CA:FALSE
# Here are some examples of the usage of nsCertType. If it is omitted
# the certificate can be used for anything *except* object signing.
# This is OK for an SSL server.
# nsCertType = server
# For an object signing certificate this would be used.
# nsCertType = objsign
# For normal client use this is typical
# nsCertType = client, email
# and for everything including object signing:
# nsCertType = client, email, objsign
# This is typical in keyUsage for a client certificate.
# keyUsage = nonRepudiation, digitalSignature, keyEncipherment
# This will be displayed in Netscape's comment listbox.
nsComment = "OpenSSL Generated Certificate"
# PKIX recommendations harmless if included in all certificates.
subjectKeyIdentifier=hash
authorityKeyIdentifier=keyid,issuer
# This stuff is for subjectAltName and issuerAltname.
# Import the email address.
# subjectAltName=email:copy
# An alternative to produce certificates that aren't
# deprecated according to PKIX.
# subjectAltName=email:move
# Copy subject details
# issuerAltName=issuer:copy
# Distribution point for this CA's certificate revocation list
#crlDistributionPoints = URI:http://example.com/crl.pem
#nsCaRevocationUrl = http://www.domain.dom/ca-crl.pem
#nsBaseUrl
#nsRevocationUrl
#nsRenewalUrl
#nsCaPolicyUrl
#nsSslServerName
# This really needs to be in place for it to be a proxy certificate.
proxyCertInfo=critical,language:id-ppl-anyLanguage,pathlen:3,policy:foo
####################################################################
[ tsa ]
default_tsa = tsa_config1 # the default TSA section
[ tsa_config1 ]
# These are used by the TSA reply generation only.
dir = ./demoCA # TSA root directory
serial = $dir/tsaserial # The current serial number (mandatory)
crypto_device = builtin # OpenSSL engine to use for signing
signer_cert = $dir/tsa.crt.pem # The TSA signing certificate
# (optional)
certs = $dir/ca.crt.pem # Certificate chain to include in reply
# (optional)
signer_key = $dir/private/tsa.key.pem # The TSA private key (optional)
default_policy = tsa_policy1 # Policy if request did not specify it
# (optional)
other_policies = tsa_policy2, tsa_policy3 # acceptable policies (optional)
digests = md5, sha1 # Acceptable message digests (mandatory)
accuracy = secs:1, millisecs:500, microsecs:100 # (optional)
clock_precision_digits = 0 # number of digits after dot. (optional)
ordering = yes # Is ordering defined for timestamps?
# (optional, default: no)
tsa_name = yes # Must the TSA name be included in the reply?
# (optional, default: no)
ess_cert_id_chain = no # Must the ESS cert id chain be included?
# (optional, default: no)
[ client_cert ]
authorityKeyIdentifier = keyid,issuer
subjectKeyIdentifier = hash
subjectAltName = email:move
issuerAltName = issuer:copy
basicConstraints = CA:FALSE
nsCertType = client, email, objsign
keyUsage = nonRepudiation, digitalSignature, keyEncipherment
# Distribution point for this CA's certificate revocation list
#crlDistributionPoints = URI:http://example.com/crl.pem
From this point on, all commands must be executed from within this certificate authority base directory. Now that everything is set up, let’s start generating certificates!
Generating Keys and Certificates
Certificates are signed by the private keys of another certificate, but how are those certificates signed? By the private keys of yet another certificate! This is the SSL chain of trust: a signed certificate is trusted only if the parent certificate is trusted.
This chain could go on indefinitely, but it has to stop somewhere. The top-level certificate in this chain is the root certificate. This certificate belongs to the certificate authority and is self-signed. The only way to mark this certificate as trusted is to add it explicitly to a (relatively small) list of trusted authorities in the client browser or operating system keychain.
Root Certificate
Before we can sign anything with our certificate authority, we must generate a self-signed root certificate. Behind every public certificate is a private key, hence the first task is to generate a new private key for our certificate authority. Even though the key is kept extremely private, it should be encrypted with a strong password for extra security in case the key should fall into the wrong hands. This password will be required to sign any certificate.
The following command generates a new 4096-bit RSA key in private/ca.key.pem encrypted with AES-256 in CBC mode.
openssl genrsa -aes256 -out private/ca.key.pem 4096Available key sizes are:
- 1024 bits (insecure),
- 2048 bits (minimum recommended), and
- 4096 bits
Available encryption algorithms include:
- -des
- DES in CBC mode broken
- -des3
- Triple-DES in CBC mode broken
- -aes128
- AES in CBC mode with 128-bit key
- -aes192
- AES in CBC mode with 192-bit key
- -aes256
- AES in CBC mode with 256-bit key
- -camellia128
- Camellia cipher in CBC mode with 128-bit key
- -camellia192
- Camellia cipher in CBC mode with 192-bit key
- -camellia256
- Camellia cipher in CBC mode with 256-bit key
Larger key sizes are more secure. Be sure to use a strong password as well!
Next we create a self-signed X.509 certificate ca.crt.pem that will remain valid for 10 years:
openssl req -new \
        -config openssl.cnf \
        -x509 \
        -days 3650 \
        -extensions v3_ca \
        -key private/ca.key.pem \
        -out ca.crt.pem
The -extensions v3_ca flag tells OpenSSL to use the configuration options in
the v3_ca section of openssl.cnf. Refer to the setup
instructions for details.
Fill out the interactive prompt with your information. Here is an example:
- Pass phrase
- A password that will be required to use the CA key to sign certificate requests.
- Country
- US
- State
- Texas
- Locality
- Dallas
- Organization
- Example Company
- Unit
- Certificate Authority
- Common
- Example CA
- keymaster@example.com
Congratulations! Now you are ready to start signing certificates.
Certificate Verification
In the sections that follow, the certificates that are generated will need to be verified by client software such as a browser or email client. This verification process can be checked prior to distributing the certificates with a simple command. To verify the www.example.com.crt.pem certificate against the root certificate (ca.crt.pem), execute:
openssl verify -CAfile ca.crt.pem www.example.com.crt.pemSite Certificates
The most common use case for SSL certificates is for use in HTTPS encryption
and server identification. First we generate a key, but this key does not need
to be encrypted since it must be accessed by a server daemon. Therefore, we can
generate both the key and the certificate signing request (CSR) in a single
command (the -nodes flag is what tells OpenSSL not to encrypt the generated
key):
openssl req -new \
        -config openssl.cnf \
        -nodes \
        -keyout private/www.example.com.key.pem \
        -out certs/www.example.com.csr.pem
OpenSSL wil ask for information about the organization, but the only vital section is the Common Name field, which must match exactly the domain from which the site will be accessed.
- Country
- US
- State
- Texas
- Locality
- Dallas
- Organization
- Example Company
- Unit
- Web Certificate
- Common
- www.example.com
- webmaster@example.com
Note: If you were acting as a real Certificate Authority for other clients, the key and CSR generation will have been done privately by the client:
openssl genrsa -out www.example.com.key.pem 4096
openssl req -new \
        -key www.example.com.key.pem \
        -out www.example.com.csr.pem
The resulting www.example.com.csr.pem would then be submitted for signing. Therefore, if your CA were listed among VeriSign, StartSSL, GeoTrust, etc., you could charge a fee to execute the following command.
Please note that there is more to being a certificate authority than just signing certificates: you need to monitor the certificates and maintain a certificate revocation list (CRL) that lists which of your signed certificates have been compromised or abused.
Finally, we need to sign the CSR and add the necessary entries in the CA database. OpenSSL takes care of all of this with the following command:
openssl ca \
        -config openssl.cnf \
        -out certs/www.example.com.crt.pem \
        -infiles certs/www.example.com.csr.pem
OpenSSL will ask you to verify the information in the CSR and prompt for the
root key’s password. Now you (or your client) can use the site certificate in
certs/www.example.com.crt.pem and the root certificate in
ca.crt.pem to secure a site with HTTPS. Here’s how to do it in Apache
mod_ssl.
Client Certificates
A lesser-known feature of SSL is the generation and use of personal keys. Personal keys are most commonly used in enterprise scenarios for client-side authentication for websites and email encryption and signing. First, we need a key and CSR for the user:
openssl req -new \
        -config openssl.cnf \
        -nodes \
        -keyout private/client.key.pem \
-out certs/client.csr.pemopenssl genrsa -out client.key.pem 4096
openssl req -new \
-key client.key.pem \
-out client.csr.pemNext the CSR has to be signed by the certificate authority and added to the CA database, but here we make use of the client_cert configuration options:
openssl ca \
        -config openssl.cnf \
        -extensions client_cert \
        -in certs/client.csr.pem \
        -out certs/client.crt.pem
The certificate is in certs/client.crt.pem, and the private key (if generated by the CA) is in private/client.key.pem, but many browsers and applications prefer personal keys to be in a PKCS 12 archive. This file contains the client’s key, certificate, and root CA certificate.
openssl pkcs12 -export \
        -in certs/client.crt.pem \
        -inkey private/client.key.pem \
        -name "Client Personal Certificate" \
        -certfile ca.crt.pem \
        -out client.p12
This file can now be imported into email clients and web browsers. See the Apache SSL chapter for instructions on setting up client-side authentication in Apache.
Certificate Revocation
In some situations, it may be necessary to mark a certificate as no longer trusted by the root CA. For example, if a key is compromised or if a site has participated in illegal activity. In the client case, this operation is common if an employee no longer works for the corporation but has been issued a certificate for authentication purposes.
To start, the certificate authority needs a place to host a certificate revocation list (CRL). This can be done in the CA base directory. The CA base directory also needs a crlnumber file that operates similarly to the serial number: with every revocation, the crlnumber will be incremented, signifying to clients that subscribe to the CRL that the list has been updated. Be sure to check that this directory and file match what is configured in openssl.cnf.
mkdir crl
echo 1000 > crlnumber
Next we generate a CRL for our CA:
openssl ca -gencrl \
        -config openssl.cnf \
        -out crl/crl.pem
Note: the CRL file can be viewed with the following command:
openssl crl -in crl/crl.pem -textThis list is often hosted through an HTTP (or HTTPS) distribution point.
And now the fun part. To revoke a certificate, we first mark the certificate as revoked, and then regenerate the CRL to reflect the updated database state. Suppose that whoever owns the www.example.com.crt.pem certificate has been naughty.
openssl ca \
        -config openssl.cnf \
        -revoke certs/www.example.com.crt.pem
openssl ca -gencrl \
        -config openssl.cnf \
        -out crl/crl.pem
Intermediate Certificate Authorities
Intermediate CAs are special authorities that are allowed to sign certificates on behalf of the root CA. This is generally more secure than signing certificates directly with the root key since there is an extra layer between the clients’ keys and the root key. It also helps with separation of duties. For example, a university that wants to allow departments to manage their own SSL certificates would allow each department to operate as an intermediate CA.
The intermediate CA requires its own directory, configuration, and database. Please refer to the setup instructions for details on how to set up a CA base directory and configuration. For simplicity, the intermediate CA can use the same openssl.cnf as the root CA.
Generating an Intermediate CA Certificate
We start by generating a key. Since this key will be used to sign other certificates, it should be password-protected like the root CA key:
openssl genrsa -aes256 -out private/ca.key.pem 4096For more information on encryption and key size options, please refer to the section on generating a root key.
Next, we need to obtain a certificate signed by the root CA, so we generate a CSR:
openssl req -new \
        -config openssl.cnf \
        -key private/ca.key.pem \
        -out ca.csr.pem
Fill out the information, but make sure the common name is different from that of the root CA.
- Country
- US
- State
- Texas
- Locality
- Dallas
- Organization
- Example Organization
- Unit
- Intermediate Certificate Authority
- Common
- Example Intermediate CA
- intermediate@example.com
The CSR is then signed by the root CA. Be sure to change to the root CA’s
base directory and then sign the intermediate authority CSR. Take note that
the v3_ca configuration extension is required to allow the resulting
certificate to be used as an authority. (The v3_ca extension was also used
to generate the self-signed root certificate.)
openssl ca \
        -config opensssl.cnf \
        -extensions v3_ca \
        -out /path/to/IntermediateCA/ca.crt.pem \
        -infiles /path/to/IntermediateCA/ca.csr.pem
Chained Verification
When verifying certificates signed by the intermediate authority, browsers and clients will also need to verify the signature on the intermediate CA against the root CA. This is accomplished with a certificate chain, which consists of all the certificates grouped into a single file:
cat ca.crt.pem /path/to/RootCA/ca.crt.pem > ca-chain.crt.pemTo verify keys, they must be checked against the ca-chain.crt.pem file instead of an individual certificate:
openssl verify -CAfile ca-chain.crt.pem certs/www.example.com.crt.pemUsing an Intermediate CA
Site and personal CSRs may be signed by the intermediate CA just as they would by the root CA. However, the certificate distribution steps must be adjusted.
When installing a site certificate, the root certificate must be replaced by the chained certificates. That is, ca-chain.crt.pem must be distributed to clients instead of ca.crt.pem.
When packaging a PKCS 12 archive for a client certificate, the -certfile
similarly must be certificate chain instead of the root certificate.
Apache SSL Configuration
For more detailed information, please see the official Apache server documentation.
Enabling SSL Encryption
After obtaining a signed certificate (e.g. www.example.com.crt.pem), Apache can be configured to use this certificate to identify itself and allow for encrypted data transfer with the use of a key (e.g. www.example.com.key.pem). Suppose that these keys are stored in /etc/apache2/ssl/ along with our CA’s certificate (or chained certificate if using an intermediate CA).
To enable SSL encryption (HTTPS) for a particular site in Apache, enable
mod_ssl and add the following to the site’s configuration (be sure to Listen 443):
<VirtualHost *:443>
  # ...

  SSLEngine on

  SSLCertificateFile /etc/apache2/ssl/www.example.com.crt.pem
  SSLCertificateKeyFile /etc/apache2/ssl/www.example.com.key.pem

  # replace with ca-chain.crt.pem if using an intermediate CA
  SSLCertificateChainFile /etc/apache2/ssl/ca.crt.pem
</VirtualHost>
Enabling Client-Side SSL Authentication
To force all users to present a client certificate for authentication (and otherwise deny access), add the following to your site configuration:
<VirtualHost *:443>
  # ...

  # replace with ca-chain.crt.pem if using an intermediate CA
  SSLCACertificateFile /etc/apache2/ssl/ca.crt.pem

  SSLVerifyClient require
  SSLVerifyDepth 2
</VirtualHost>
Specifying a Client CRL
The following configuration tells Apache to check a for revoked client certificates
<VirtualHost *:443>
  # ...

  SSLCACertificateFile /etc/pki/CA/crl/crl.pem
</VirtualHost>